Saturday, March 16, 2013

Thank You!!!!!!!!!!!!!

Thank you so much everyone for your help! I sincerely appreciate it! I hope to have some new pictures soon of the installed and painted window and door!

Can someone tell me how to respond to comments directly to the person that left the comment rather than just as a reply on my blog post? I'd really like to be able to send a response right to the commenter!

I'm so impatient to try to find answers to some of these questions I seem to have!!!


Friday, March 8, 2013

Dollhouse Continuation and I need some HELP

If I could get this dollhouse done before nice weather starts up, I would be over the moon. It's such slow going because for me the construction is so hard.

I'm so excited that I found a door for the lower section.
 Now to get it painted and touch up all the siding paint that I've messed up with taking old windows and doors out and adding the newer/nicer ones. I'm thinking of painting the door white to match the windows but then painting that square the the oval window sets in, brown to match some of the trim on the house.

I lost a piece of this kit that was to be used for the porch roof, which would be the little balcony for the door on the second floor. I'm so hoping when I get to that point I won't get frustrated and let this sit for another 5 years. I'm hoping I have the perseverance to figure out how to fix that and move on. As soon as I get this painting done that will be the next step.

Here is the bay wondow for the front of the house.... You can see that the window is too big for the opening where there was two windows.

Now I have to cut the window opening a bit more so the window will fit in there and figure out how to attach the window to the house. I need help.....do I just glue the window to the outside of the house? All the windows in this house slide into the window opening. This bay window does not. There's nothing to slide in. It's flush on the back. I did a google search to see if I could find some info but I found nothing. Any help would be greatly appreciated. It's things like this that frustrate me and it's hard to drag myself back. I'm just not up to the challenges anymore that this house is creating for me. But I'm bound and determined that I'm going to finish this!

Have a great day everyone!

Sunday, February 24, 2013


Looking out my kitchen window after a snowfall. I just think it's beautiful to see the snow on the trees.


And here is a picture from last week of Mr and Mrs Cardinal in these same trees. If I have to stand and this window and wash dishes in the sink at least I have something beautiful to look at!
 
 
I must add that I absolutely love the camera my family bought me for Christmas too. It makes taking pictures like this possible. It has an awesome zoom lens!
.

Please take a moment and go over to this blog http://petitevictorianrose.blogspot.fr/2013/01/petite-french-away.html to sign up for this gorgeous giveaway. Absolutely stunning work! Don't you agree?

Saturday, February 23, 2013

 
Is this not the most gorgeous thing you've ever seen? Look at these teeny tiny jars of fruits, veggies and more. I just love love love them.
And you must run right over to http://elrincondemaluga.blogspot.com/ and sign up for a chance to win 3 of these jars! I have my fingers crossed that I am going to be a winner! I would just love love love to have some of these in my collection. She also sells on Etsy so you can always go there and buy all that you desire! She does such beautiful work.
 
I need to figure out how to add a link on the side of my blog list for give-aways. Could someone give me some pointers as to how I can do that? I'm very challenged computer wise and I've tried to do this in the past to no avail. If you could give me some easy instructions I would so greatly appreciate it!


I had to take a break from the dollhouse for a few days to make hair bows for my grandaughters. You know, there is just not enough hours in the day to create all the crafts I want to do. Jeez! I have more bows to make but these two were a good start. And a headband using handmade Korker ribbon
 
 
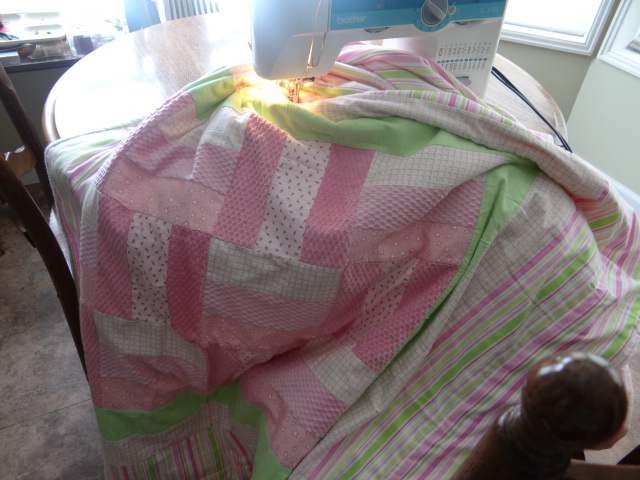
And I finished up the comforters I started for the 2 grandgirls about 5 years ago. My daughter bought the fabric. I just needed to sew it all together. The middle shabby is all one piece. From JoAnns fabric. I sewed the striped border on. We love this fabric.
 
 So they're both done. And then I got back to the dollhouse and I finished up the porch floor finally.


About 6 layers of Polycrylic sealer later......
I have to cut the ends off on the right hand side of the porch and finish glueing in a couple more sticks in the far right corner/back of the porch. But that shouldn't take more than a few minutes and then I can start constructing the porch.

I'm looking for a couple of doors and some louvered shutters if anyone has any that they would care to part with. I would pay you a reasonable amount of course or perhaps you would be interested in a trade of some sort. I'd really like to find a door with a window in it and some nice door trim for the bottom floor. I think I might have a door that is all windows to use for the top balcony. I've been replacing all the windows etc from what came with the kit because they aren't very good quality. But my funds are very limited these days so I have to work mainly with what I have on hand.

I have a large bow window to go on the front of the house. You can see that sitting up on top on the roof. A safe place for it don't ya think? LOL!

I am determined to get this dollhouse done!!!!!!!!!!!!!! I absolutely love this house and it was a dream come true for me to be able to purchase it in the first place. So I am trying really hard to be focused and to get it done!

I'm leaving you with a picture from out my kitchen window. A Mr. and Mrs. Cardinal. Aren't they beautiful? Did you know that the bright colored birds are usually the male and the muted colored ones are the female? For safety reasons.

.

Cheerio! May you all be having a wonderful weekend wherever you may be.
.
.
 

Saturday, February 2, 2013


Thank you so much everyone for your comments and advise! I sincerely appreciate you taking the time to do that! I've decided to go along with all of you and place the porch sticks horizontal and stagger them! Yesterday morning I gathered my supplies and layed it all out. Cut the rounded ends off the sticks and sanded and stained them.


I ended up not using that golden oak stain because it was too light. I just happened to have a spray can of a hickory color so I used that. I found the spray can of satin at a lawn sale one summer a few years ago. I didn't know stain came in a spray can. So easy to use! Just lay your wood out, shake the can and spray away. No mess!
.

I think the color looks a little bit reddish but I think once it dries better and I add the polyurethane it will be even better! I can't wait to get to that point! I can't wait til the railing is up and the plants are hanging and the wicker furniture is placed! I'm so excited!

But first I have to work on getting these glued down. They're just laying there right now so I could get a pic to show you how it's coming along!

Thanks for being here for me and helping me along!


Wednesday, January 30, 2013

I need to start this post off with an excuse I suppose. Well maybe not so much an excuse, maybe more a reason why I've ignored my blog for so long. Actually it's quite simple, real life had gotten in the way. So much to do and so little time to do it all. The thoughts have gone thru my mind as to whether I should give it a go again or admit that it had been so long I should just hang it up. I decided to give it a go! Or at least a try.

And I'm going to start off with a question to you. Well to those of you that may still be around and will see it! LOL! That may not be too many people!


I am back to working on finishing my dollhouse. It's the Bellingham farmhouse by Duracraft. The inside is mostly done, I have a bit of shingling to finish on the roof. And since I've replaced the windows that came with the kit with better ones I still have those to finish ripping out and painting the new ones.

I also need to finish the porch! And this is where I need a little help! I want to add wood stir sticks to the floor of the porch to have a wooden floor. Before I do the railings. My question is: which direction should the stir sticks go? I can't for the life of me decide.

So please help me out!

 
Would you choose the straight out from the door method on the left or the staggered from left to right across the porch that is shown on the right?
Don't forget to click on the picture for a close up view. I think if you click once and then click again the picture gets even larger. Then you can really see all of my goofs. Ha!
So.........
 
Whatcha think?
. 

Thursday, May 3, 2012

Give Away

I'm so sorry i've been so absent but real life is just taking over my mini life right now. My youngest is preparing to give birth to a little baby boy and we're having a baby shower soon for her. So much work.

But I do want to tell you about a wonderful give away. You must hurry over and sign up! You'll love this one!

http://cynthiascottagedesign.blogspot.com/

I'll be back very soon with some pictures of the awesome gifts I've recieved from my MGR friends. Absolutely gorgeous minis. And I'll show you what I've been working on!

Soon my friends......soon!

Until then I hope you're all having wonderful weather to get out into! We have been! And I've been loving it!

Saturday, April 21, 2012

By Golly I Found It

Don't ask me how but I found my way to the link that let me set everything back to the way it was. Now I wonder how long it will stay that way? Thank you ladies for helping me!

What the heck

How do I get to see my list of blogs that I follow?

Sunday, April 8, 2012

A Beautiful Mouse Giveaway

om de give away op je website/blog zijbalk te plaatsen

You must hurry over and check this out. Gorgeous!

Wednesday, March 28, 2012

CupCake Anyone?

My little contribution for the Easter decor!

It's a dark and dismal day here today so the pics could be a little clearer, brighter. But I think you get the idea!
Wishing everyone a wonderful day!

Friday, March 23, 2012

Mini Go Round Swapping Group

Mini Go Round or MGR for short is the name of a private swapping group I am so fortunate to belong to. This is a group of the most amazing miniature creators. I've recieved 100's of miniature creations from these ladies over the course of approx. the last 10 years. I've filled my roomboxes with so many creations that I wouldn't have if it weren't for these ladies. I can't sing thier praises enough.

I'll share some pictures in a few minutes. In my last post I showed you a wicker plant stand that I made one time for all of the ladies in the group. I made 10 or 11 of them. One for each of the ladies and one for myself. That's how the group works. We have a box of swaps. When the box arrives at my house I put in enough of what I've made so that each lady in the group recieves one. I then take out one "gift" from each of the ladies that they've put in the box. Then I mail it on to the next lady in the group. She in turn does the same. Adds her miniatures, one for each of the ladies and then takes one from each of the others, including one of what I have just put in. It's an interesting adventure!

Sometimes we have themes that we create for. Such as the project we all worked on together, the Little Girls roombox. We all made things along that theme, things you'd find in a little girls room. We were so happy with the way that turned out that we submitted pictures and articles for the American Miniaturist Magazine, the April issue. If you get that magazine you'll see us in there. Jaime and I also have some really cool tutorials we wrote for the mag. I think this is the 4th time we've been in the AM magazine. We've done an article on a basement theme we did and also a Ladies Boutique theme.

The reason I'm talking a bit more about this group than I usually do is twofold. one because I'm so dang proud of these ladies. And two is because we have had a couple of ladies leave the group because of health reasons. We really like to keep the group at the number 10. That seems to be a nice number for a few reasons. It means the box usually take approx 2 - 3 months to make it's travel back to you so you have plenty of time to make a nice miniature for each of the ladies. And it makes a nice number of miniature creations to receive!

So I'm wondering if maybe there are a couple of people out there that might like to give this venture a try? If you'd like to know more about us you can read all about us in the American Miniaturist magazine. We have been together for about 10 years. We very seldom add new members because no one usually ever leaves. Right now we've had one member leave because she has health problems that she has to concentrate on and another lady is taking care of her elderly mother and needs to take a break to concentrate on her mothers care.

I realize that this is a big commitment. It shouldn't be entered into lightly. The group means a lot to all of us and we've worked hard to keep it strong. We would expect that from a new member too. We put a lot of time and pride into making miniatures to share. That's a big commitment too.

And also one requirement would be that you're located in the United States. The box can not be sent out of the country. It would be too expensive as it is a large box. Usually the larger of the priority boxes. Shipping cost can be anywhere from $8.00 to.... I've seen it as high as $21.00. It usually averages about $12.00 to be mailed. Another thought that needs to be considered. But trust me....the minis inside more than make up for the small cost to mail it! And you only mail it out a few times a year.

If this sounds like a challenge that you may be up to please feel free to contact me privately and I'll try to answer any questions you may have. My email is clpetry126@frontiernet.net

I can't wait to hear from some potential future MGR members.

And now some pictures of MGR members contributions.


Everything you see in these pictures was handcrafted by the ladies in the MGR group. They are awesome! Thank you ladies! In fact most everything you see in my Ladies Boutique and Little Girls Roomboxes were made bymembers of the group. If you look down thru my blog posts you'll see pictures of these roomboxes. I think you can click on the link on the right where my entry labels are to get there too.

Monday, March 5, 2012

Wicker Plant Stand

Good Morning! Welcome to all of my new followers! It's nice to see you here and I've been checking out all of your blogs too. So much talented writers and creators. I could sit right here all day just reading and reading. But unfortunately real life gets in the way. But I do read as many as I can every day!

I thought I would share a couple of pictures of a little wicker plant stand I made a while back. I made one for each of the ladies in my my miniature group MGR. A wonderful group of creative miniaturists. I'll share some pictures soon of miniatures I've recieved from these lovely ladies!
But for now.....I showed these planters a while back when I was making them. This is the one I ended up keeping for myself.


This green leafy plant is made from masking tape, wire and then painted. The other plants are just some plastic bits and pieces. I'd really like to replace them with some hand created ones. Another project on my to-do list!
Have a great day everyone!
.

Sunday, March 4, 2012

Another Gorgeous Giveaway!

The Little House at Pine Haven: SPECIAL POSTMY FIRST GIVEAWAY!The draw will be h...

Run right over to

The Little House at Pine Haven:

for an awesome giveaway! It's an incredibly unique purse! OK I've trid and tried and I can't link up a picture for some reason. Maybe blogger isn't co-operating! So just follow this link

http://thelittlehouseatpinehaven.blogspot.com/2012/02/special-post-my-first-giveaway-draw.html?spref=bl


and see for yourself!

I still haven't been able to figure out how to put a link on my sidebar for giveaways and such. Someone tried to help me but nothing I did worked. It's just not my blogger day today!

OH What A Mess I've Made

This is the worst part of making a new miniature......cleaning up the mess! If only I could get someone else to come in and do that part! But I'm sure I'd never find where they put all my "stuff". And I can't be without my "stuff".
Here's a little peek! I already did clean up a great deal of it. All the little scraps of matboard....the wax paper I did my glueing on....the cup of water to clean off my brushes...the little wet rags I use to clean up a bit as I go....all of that is gone. All that's left is all the tools. And I need to leave it all out because I still have to make the faucet and drain. Did you notice that there wasn't a faucet on it yet? I also need to make the crown moulding along the top of the upper cabinets. That is an awesome touch and I really want to do it.

I just couldn't wait to show you!

Did you also notice the other little important stuff like the telephone and the cup of coffee? Hee...Can't be anyplace without those. Unless I change up the coffee for a diet Mountain Dew!


OH And I'm going to make the kitchen hutch that Kris made a tutorial for too. I want that to go with this kitchen cupboard set. Not sure what scene I'm going to create around it yet. If I go too far with this scene I'll need to add a stove and refrigerator. Table and Chairs. Hummmmm lots of ideas!

I've always wanted to create a scene in a pretty box. Not sure what they're called....oh wait....maybe....breakaway? But I don't want it to close up. I want two sides of the box to be open with plexiglass. What do they call those boxes? Maybe I can use this in a box such as that. We'll see what develops.

I think it was Chris that asked me in the last post where I got the matboard. I bought it at Hobby Lobby. I bought a big sheet....I think it was like 32" x 40" and I paid 12.99 for it. I asked them to cut it in half for me so it would be easier for me to handle and they even enveloped it in cardboard for me. That was really nice of them! I think someone mentioned one time that they got their supplier to give them some of the small pieces they can't use for picture framing. I'll have to try to remember to ask next time I go in. I don't get to go there very often since it's over an hour away. But my daughter lives up there and I always make a point to go in to the craft stores when I'm there visiting her.

Have a great day everyone. Here in New York it's nice and cold and sunny. A perfect day to work on miniatures! I hope you find time today to do that too!

Saturday, March 3, 2012

A Kitchen for my mini people


blog (1 inch minis by kris) I knew that I was going to have to make it! I just fell completely in love with it for some reason. Well the reason could be because it's just completely gorgeous!

Kris's tutorials are absolutely amazing! Perfect for the beginner or the advanced. I've learned so much from her posts!

I still have a few things to finish up....and I'll show you this again when I get them done. I was just so excited to show you I couldn't wait another day!


Even mine turned out pretty good I think and it was the first time I've ever worked with matboard before.
Thank you so much Kris for your creativeness and generosity! This tutorial was so well planned out and expained and photographed! You are Amazing! I still need to work out the aging process. I ended up leaving it pristine white. I'll have to practise that aging technique.
I encourage everyone to give this a try! It took some time but it just flowed along so well! Thank you thank you thank you!

Sunday, February 5, 2012

MILE A MINUTE MINI AFGHANS

Oh my goodness it's been so long again since I've been here to post on my own page. I come here every day to read all of my favorite blogs but I just can't seem to stay long enough to write a few words!

So today it's nice and quiet here. No one home but me. So I'm staying here in blogland a little longer and I'm going to show you a picture of some mini afghans I made. For a few friends!

These were such fun to work up but my poor hands were so sore. I had to work in bits and pieces of time because my hands/fingers would stiffen up and not move very well. And hurt....oh my. My poor pinky finger wanted to stay curled up and not stretch out....it hurt so bad to straighten it!

But I think the end results were worth a little pain don't you?


The one on the right that is the pink green and white was suppose to look a bit shabby and ended up looking a bit watermelon-y. And the reason for that is my green is too bold. But I looked high and low for some pale green tatting threads in size 70 or 80 but no matter where I looked I couldn't find it. Oh I was so disappointed. I even had a friend send me some that she had and that was the same color I had. So if anyone out there in blog land reading this knows where I can get some or knows someone that might know please let ME know. Wow did that sound like a tongue twister? Ha! But I would really really really like to get my hands on a couple of balls of very light/pale green tatting thread.

I hope ya all are surviving the winter. Those of us here in New York have had the easiest winter that I can ever remember having. I hope we don't end up having a super dry summer or a summer filled with rain because we didn't get the snow we should have. Or that we need really inorder to supply our water table.

My husband is an ice fisherman and up til now he's been pouting because he hasn't had enough ice on the ponds and lakes to go fishing. But finally a few weeks ago the low temps moved in and most of the water ways are frozen deep enough to go out on. So he's a happy fisherman now! And I'm happy because I have a bit more peace and quiet to mini away the day! Like today! So off I go to try to create something tiny! I hope to have some creations listed on ebay in the near future if you're interested in checking them out. My ID is Peechtree-minis.
Have a great day everyone!


.
.